Technical Documentation
RADOS Block Device
RADOS Block Device (RBD) allows Ceph object storage mapping to local block devices using the RBD kernel module or mapping to a Virtual Machine (VM) via hypervisor that is utilizing direct librbd access to the object storage. The mapped block devices could subsequently be accessed for block storage or formatted with one of the many Linux file systems, therefore exposing the storage via standard file access methods.
As Ceph architecture does not allow frequent creation and reconfiguration of pools, we will create one CephX access key and one RBD pool pair per institution or per department and set a fixed quota at the pool level. CephX access key will allow each institution to use standard rbd client tools to create and manage RBD images within the given pool.
Please contact us at help@nese.mghpcc.org to establish and obtain your institutional uid, access key, RBD data pool and RBD metadata pool.
General RBD Access Setup
Fast direct network connection to the NESE OSD nodes located in the cluster data network 10.255.116.0/23 is required for RBD usage. For more info about establishing such a connection see Direct Network Connection section.
To reduce incompatibility issues it’s best to use the same version of Ceph client tools as the NESE Ceph cluster runs on. NESE cluster is currently running Ceph version 14 (Nautilus). Ceph RBD client tools are provided by the ceph-common package distributed by various linux distributions and available directly from the upstream development repositories located at http://download.ceph.com/.
After obtaining and installing the ceph-common package, make sure that the /etc/ceph/ceph.conf general section contains cluster monitor hosts line and the client section contains rbd default data and metadata pool names:
mon host = [v2:10.255.116.11:3300,v1:10.255.116.11:6789],[v2:10.255.116.12:3300,
v1:10.255.116.12:6789],[v2:10.255.116.13:3300,v1:10.255.116.13:6789],[v2:10.255.
116.14:3300,v1:10.255.116.14:6789],[v2:10.255.116.15:3300,v1:10.255.116.15:6789]

[client]
rbd default data pool = <data-pool>
rbd default pool = <metadata-pool>
Create /etc/ceph/ceph.keyring file and limit access to root only:
$ touch /etc/ceph/ceph.keyring
$ chown root:root /etc/ceph/ceph.keyring
$ chmod 0600 /etc/ceph/ceph.keyring
Put your access key in the /etc/ceph/ceph.keyring file:
[client.<uid>]
        key = <cephx-access-key>
Test direct access to the NESE ceph cluster:
$ ceph --id <uid> status
Check quotas to set on your data and metadata pools:
$ ceph --id <uid> osd pool get-quota <data-pool>
$ ceph --id <uid> osd pool get-quota <metadata-pool>
RBD Images for Physical Machines
Create a new RBD image:
$ rbd --id <uid> create <image> --size 4T
Get info about an image:
$ rbd --id <uid> info <image>
List all RBD images:
$ rbd --id <uid> list
List current usage per image:
$ rbd --id <uid> du
Manually map RBD devices
$ rbd --id <uid> device map <metadata-pool>/<image>
If your kernel does not support all the features enabled on the given image you might get an error message explaining possible course of action. At this point you should upgrade your kernel to a newer version. Disabling features is not recommended.
List all mapped devices:
$ rbd device list
The mapped rbd device persistent naming follows this pattern:
/dev/rbd/<metadata-pool>/<image>
At this point you can create a file system on the block device:
$ mkfs.xfs /dev/rbd/<metadata-pool>/<image>
Auto-map and auto mount RBD devices on boot
Use noauto and noatime options in the /etc/fstab file:
/dev/rbd/<metadata-pool>/<image> /mnt/dir xfs noauto,noatime 0 0
Enable rbdmap service:
$ systemctl enable rbdmap.service
List each rbd device on a separate line in /etc/ceph/rbdmap file:
<metadata-pool>/<image-name> id=<uid>,keyring=/etc/ceph/ceph.keyring
At this point you can test device mapping and mounting manually:
$ rbdmap map /dev/rbd/<metadata-pool>/<image>
Or unmount and unmap a device manually:
$ rbdmap unmap /dev/rbd/<metadata-pool>/<image>
At every system boot the rbdmap service will map all rbd devices listed in the /etc/ceph/rbdmap file and then mount only those listed in the /etc/fstab file.
RBD Images for Virtual Machines
QEMU/KVM Hypervisor Commands
Create a new QEMU RBD image:
$ qemu-img create -f raw rbd:<metadata-pool>/<image>:id=<uid> 10G
Get the QEMU image info:
$ qemu-img info rbd:<metadata-pool>/<image>:id=<uid>
Boot the VM up:
$ qemu -m 2048 -drive format=raw,file=rbd:<metadata-pool>/<image>:id=<uid>
Resize the QEMU image:
$ qemu-img resize rbd:<metadata-pool>/<image>:id=<uid> 15G
Globus Configuration
The Globus system ultimately allows researchers to easily share large amounts of data with external collaborators. Project NESE offers Globus institutional endpoint setup with flexible administrative tasks delegation to its institutional members and researchers.
Delegation of Roles
Role delegation hierarchy consists of institutional NESE coordinators, research groups with shared collections administrators and researchers as the end users of the shared collection directories.
Delegated Roles Tasks
A NESE coordinator at a school or a department of a NESE institutional member requests allocation of NESE resources and access to the NESE Globus institutional endpoint with the aim to administer creation of Globus shared collections for their respective research groups.
Research groups sponsored by a NESE institutional member place requests for Globus shared collections to their respective NESE coordinators who in turn create shared endpoints and delegate administrative tasks to their respective shared collection administrators.
Shared collection administrators create subdirectories of a shared collection, manage Globus users permission access to specific subdirectories and promote Globus users to the administrator role at the shared collection level.
Researchers use their Globus accounts to transfer data between their local endpoints and the directories located in the shared collection.
Delegated responsibilities
NESE Coordinator
At university, school or department level
Holds a Globus service account
Holds a NESE service Unix account
Creates shared endpoints (shared collections) using the Globus service account
Assigns administrator roles to Globus users at shared collection level
Comprehends Globus interface and affairs
Answers user’s questions
Note
NESE Coordinators can create a service Globus IDs at https://www.globusid.org/
Researches, end users
Need a Globus account only
Install globus connect on their local machine
Manage transfers through a Globus interface
Globus web interface
Globus command line interface
Globus Endpoint Types
To facilitate transfers between the NESE hosted Globus endpoints and your local storage, install and set up a Globus endpoint on your side.
Detailed set up instruction is available at:
NESE hosted Globus endpoint types
Managed endpoint (institutional endpoint)
Not used by general Globus audience
Hosts shared endpoints (shared collections)
Facilitates shared endpoint creation (NESE Unix account authentication required)
Shared endpoint (shared collection)
Readable and writable by any authorized Globus user
Administered by Globus users having an administrator role assigned
Access control administered at subdirectory level
Institutional access to the NESE management endpoints
A NESE coordinator at a school or a department of a NESE institutional member shall request NESE managed Globus endpoint access and storage allocation with aim to administer creation of Globus shared collections for a specific group or a research project by sending a mail message to help@nese.mghpcc.org wit the following content:
Username
Encrypted Password
Storage Allocation
Sponsoring Institution
Department/Group
Contact Name
Contact Email
Username is a Unix type of username which will be used during Globus managed endpoint access activation through the Globus user interface. The requested NESE Unix account is a service account intended for and shall be tied to a group/school/department; not to a specific person.
Encrypted Password is an authentication string produced by running the following command on any modern unix or linux system:
$ openssl passwd -6
when prompted type in a new password and then copy and paste the resulting string into the Encrypted Password field of your message. Storage Allocation is requested storage allocation for all shared collections under this group in usable terabytes subject to adjustment and approval. Project NESE is not responsible for data loss; users are advised to keep a copy of important data offline.
Note
Remember or save the password generated aboe for later use
Globus Quick Start References
Globus web interface: https://docs.globus.org/how-to/get-started/
Create Globus Shared Collection: https://docs.globus.org/how-to/share-files/
Globus command line interface (CLI): https://docs.globus.org/cli/
Globus ID service https://www.globusid.org/
Globus connect set up instruction is available at
NESE Networks
While some administrative related resources are accessible through VPN connection, the general NESE resources are accessible either via the Internet or through a direct network connection to the NESE networks.
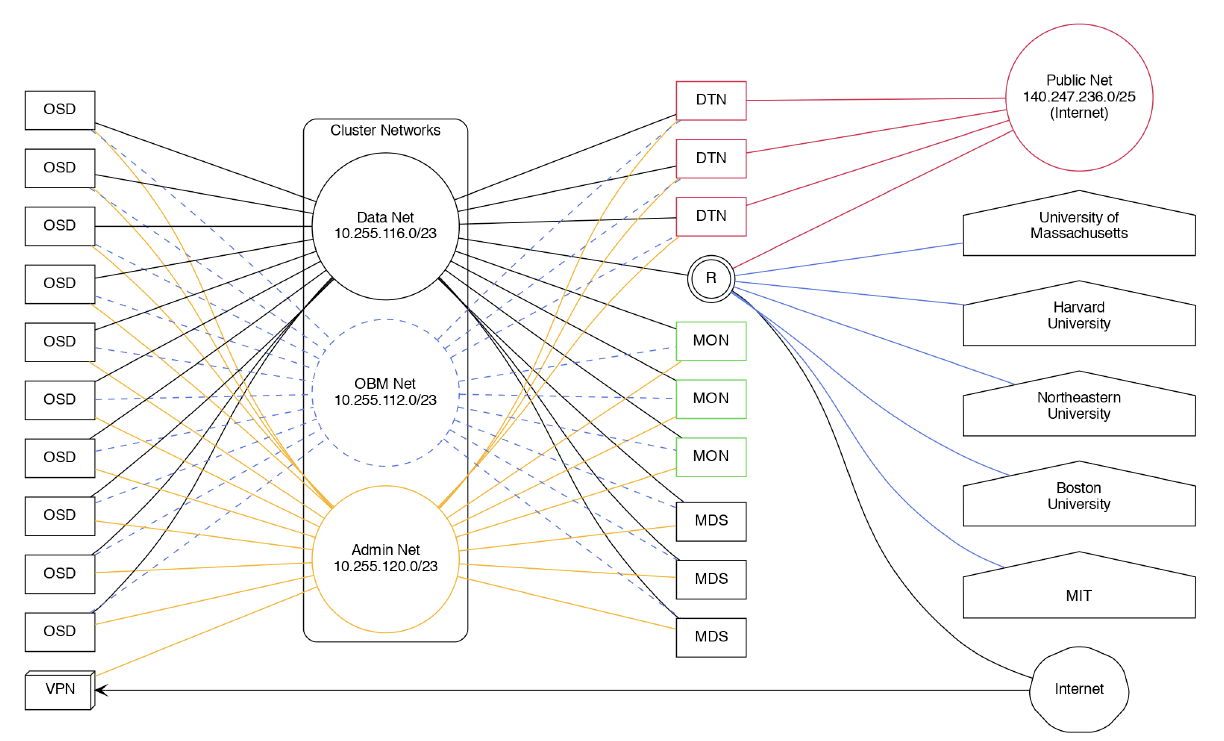
Direct Network Connection
Fast direct network connection to the NESE public network and/or cluster data network is essential for optimal performance. To connect to the NESE Arista switch/router run a pair of 100Gbe or 40Gbe QFSP 28 cable to 7-B-12 in MGHPCC. Based on your need for direct access to the cluster data network, decide if you want the 10.255.116.0/23 to be announced to you. Provide point-to-point addressing for BGP peering and the prefix you will announce to our network engineers. Contact Nick Amento or Christian Ranney with network connectivity related questions.